前回に引き続きyahooメールのSSLメールをやってみました。
m5stack-build.hatenablog.com
参考サイト
参考にさせていただきました。ありがとうございます。
www.kerislab.jp
参考にさせていただいソースからの変更点
・SMTPサーバのアドレス。詳しくはこちら→Yahoo!メールヘルプ
・証明書の設定。SSLには証明書が必要です。
・SSLメールは証明書の検証とかで通常のメールより少し時間がかかるのでタイムアウト値を長くしています。
サンプルコード(mail.ino)
#include <M5Core2.h>
#include <WiFi.h>
#include "Mailer.h"

const char* smtp_username = "username";
const char* smtp_password = "password";
const char* smtp_from_address = "user@yahoo.co.jp";
const int smtp_port = 465;
const char* smtp_hostname = "smtp.mail.yahoo.co.jp";

const char* to_address = "user@gmail.com";
const char* subject = "From M5stack";
const char* content = "Hello, this is M5stack Core2.";

Mailer mail(smtp_username, smtp_password, smtp_from_address, smtp_port, smtp_hostname);

void setup() {
  String config_ini;
  String ssid;
  String password;
  unsigned short ausIdx = 0;

  /* 初期化 */
  M5.begin();
  /* SD初期化 */
  SD.begin();

  Serial.begin(115200);
  delay(10);

  /* 文字サイズを変更 */
  M5.Lcd.setTextSize(1);

  /* ファイルオープン */
  File datFile = SD.open("/set/config.ini");
  if( datFile )
  {
    M5.Lcd.println("File open successful");
    Serial.println("File open successful");
    /* サイズ分ループ */
    while( datFile.available() )
    {
      config_ini = config_ini + datFile.readString();
    }
    /* ファイルクローズ */
    datFile.close();
  }
  else
  {
    M5.Lcd.println("File open error hello.txt");
  }
  /* SSID取得 */
  config_ini = config_ini.substring(config_ini.indexOf("#SSID\r\n") + 7);
  ssid = config_ini.substring(0, config_ini.indexOf("\r\n"));
  /* パスワード取得 */
  config_ini = config_ini.substring(config_ini.indexOf("#SSID_PASS\r\n") + 12);
  password = config_ini.substring(0, config_ini.indexOf("\r\n"));

  /* connect to WiFi */
  M5.Lcd.print("Connecting to YOUR_SSID ");
  Serial.println("Connecting to YOUR_SSID ");
  /* wifi初期化 */
  WiFi.begin(ssid.c_str(), password.c_str());
  while (WiFi.status() != WL_CONNECTED) {
      delay(500);
      M5.Lcd.print(".");
  }
  M5.Lcd.println(" CONNECTED");
  Serial.println(" CONNECTED");

  /* disconnect WiFi as it's no longer needed */
//  WiFi.disconnect(true);
//  WiFi.mode(WIFI_OFF);
  mail.send(to_address, subject, content);

}

void loop() {
    delay(10000);
}
サンプルコード(Mailer.h)
/*
    ESP32 E-mail Library
    Author:  kerikun11 (Github: kerikun11)
    Date:    2017.04.08
*/
#pragma once

#include <ssl_client.h>
#include <WiFiClientSecure.h>
#include <base64.h>

const char* yahoo_root_ca= \
"-----BEGIN CERTIFICATE-----\n" \


 ここに証明書の内容


"-----END CERTIFICATE----- \n";

class Mailer {
  public:
    Mailer(const char* username, const char* password, const char* from_address, const int smtp_port = 465, const char* smtp_hostname = "smtp.mail.yahoo.co.jp"):
      username(username), password(password), from_address(from_address), smtp_port(smtp_port), smtp_hostname(smtp_hostname) {}

    bool send(const String& to_address, const String& subject, const String& content) {
      WiFiClientSecure client;

      client.setCACert(yahoo_root_ca); /* ここで証明書の設定 */

      Serial.printf("Connecting to %s\n", smtp_hostname);
      if (!client.connect(smtp_hostname, smtp_port)) {
        Serial.println("Could not connect to mail server");
        return false;
      }
      if (!readResponse(client, "220")) {
        Serial.println("Connection Error");
        return false;
      }
      client.println("HELO friend");
      if (!readResponse(client, "250")) {
        Serial.println("identification error");
        return false;
      }
      client.println("AUTH LOGIN");
      if (!readResponse(client, "334")) {
        Serial.println("AUTH LOGIN failed");
        return false;
      }
      client.println(base64::encode(username));
      if (!readResponse(client, "334")) {
        Serial.println("AUTH LOGIN failed");
        return false;
      }
      client.println(base64::encode(password));
      if (!readResponse(client, "235")) {
        Serial.println("SMTP AUTH error");
        return false;
      }
      client.println("MAIL FROM: <" + String(from_address) + '>');
      if (!readResponse(client, "250")) {
        Serial.println("MAIL FROM failed");
        return false;
      }
      client.println("RCPT TO: <" + to_address + '>');
      if (!readResponse(client, "250")) {
        Serial.println("RCPT TO failed");
        return false;
      }
      client.println("DATA");
      if (!readResponse(client, "354")) {
        Serial.println("SMTP DATA error");
        return false;
      }
      client.println("From: <" + String(from_address) + ">");
      delay(100);
      client.println("To: <" + to_address + ">");
      delay(100);
      client.println("Subject: " + subject);
      delay(100);
      client.println("Mime-Version: 1.0");
      delay(100);
      client.println("Content-Type: text/html");
      delay(100);
      client.println();
      delay(100);
      client.println(content);
      delay(100);
      client.println(".");
      if (!readResponse(client, "250")) {
        Serial.println("Sending message error");
        return false;
      }
      client.println("QUIT");
      if (!readResponse(client, "221")) {
        Serial.println("QUIT failed");
        return false;
      }
      Serial.println("Sending E-mail Successful");
      return true;
    }

  private:
    const char* username;
    const char* password;
    const char* from_address;
    const int smtp_port;
    const char* smtp_hostname;

    bool readResponse(WiFiClientSecure &client, const String &target, uint32_t timeout_ms = 10000) {
      uint32_t timeStamp = millis();
      while (1) {
        if (client.available()) break;
        if (millis() > timeStamp + timeout_ms) {
          Serial.println("SMTP Response TIMEOUT!");
          return false;
        }
        delay(1);
      }
      String res = client.readStringUntil('\n');
      res.trim();
      Serial.printf("Response: %s\n", res.c_str());
      if (target != "" && res.indexOf(target) == -1) return false;
      return true;
    }
};
yahooメールの設定
yahooメール側での設定も必要です。
「Yahoo! JAPAN公式サービス以外からのアクセスも有効にする」を選択し、「IMAP」「POP」「SMTP」を全て「有効にする」を選択します。
SMTPだけ有効にすると「Yahoo! JAPAN公式サービスを利用したアクセスのみ有効にする」が適用されてしまうみたいです。

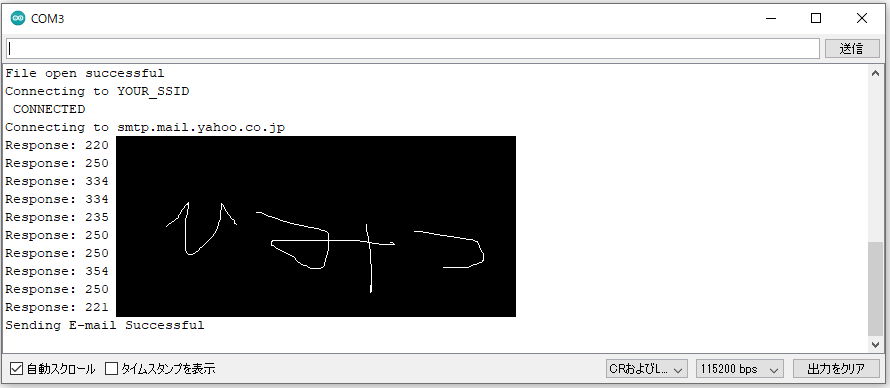
実行結果
シリアルではサーバとのやり取りを出力しています。
実際に受信したメールがこちら
